How to create Accounts
You will learn how to set up and customize accounts used for financial transactions, tax calculations, and other accounting-related functions. Here's a breakdown of the key elements you might find in the Accounts tab:
- Chart of Accounts:
This is a comprehensive list of all the accounts used by the company for recording financial transactions. It typically includes various categories like assets, liabilities, equity, revenue, and expenses. Each account is given a unique code and name, and the chart is used for accurate bookkeeping and reporting. - Account Creation and Configuration:
In this tab, you can create new accounts by defining their names, descriptions, and associated codes. You can also specify details like the account type (e.g., asset, liability, income, expense), and set up default tax rates or any specific rules for how the account will be used. - Tax Rate Management:
You can manage tax rates associated with specific accounts, including setting default tax rates for accounts, especially when dealing with sales, purchases, or other taxable transactions. This section helps ensure that taxes are applied consistently across the company's financial transactions. - Account Archiving and Deactivation:
In this tab, you may have the option to archive or deactivate accounts that are no longer in use, keeping your accounting records clean while maintaining historical data. Archived accounts remain in the system for reference, audits, or reporting purposes but will not be used in future transactions. - Default Accounts:
You can set default accounts for certain transactions, such as accounts for sales, purchases, or expense categories. These defaults help streamline your workflow, as they automatically populate during transaction entries. - Account Reporting and Visibility:
The Accounts tab can provide reports on account activity, balances, and usage. It helps ensure that all accounts are correctly classified, and balances are up-to-date, providing clarity for financial analysis, audits, and tax reporting.
Overall, the Accounts tab in Company Settings is essential for setting up and maintaining the financial structure of your company within 3PM, ensuring that your financial transactions are well-organized, compliant, and accurate.
To create a Chart of Accounts do the following:
2. Click on the Accounts tab
3. Click on the + button top right to add Accounts.
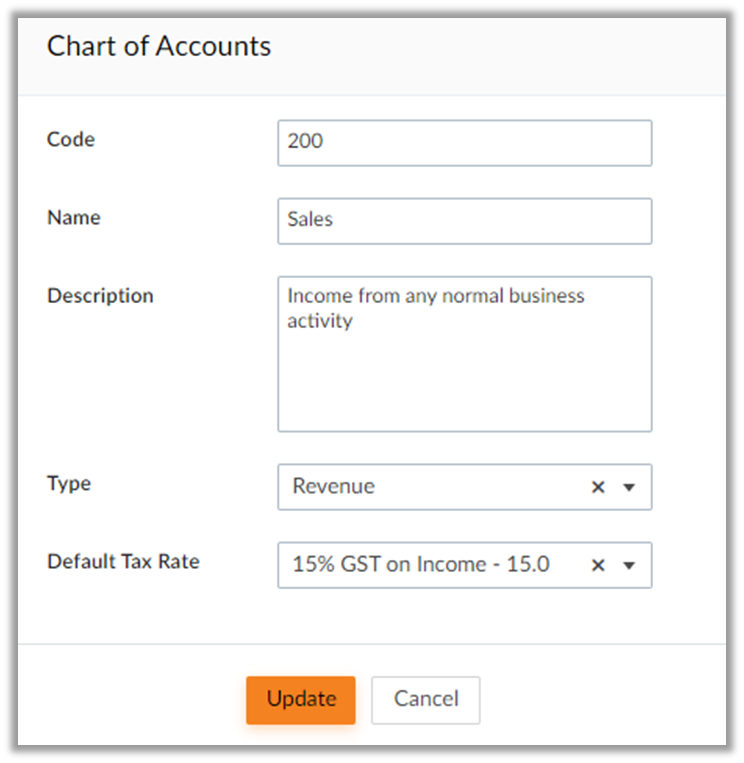
4. You can use any Code for an account as long as it's unique. Enter the Name, Description, and choose the Type of the Account and Default Tax Rate from the dropdown list.
5. Click on the Update to Save.

 Note: Choose the Type from Drop down list
 Choose Default Tax Rates from Drop down list. Clicking on + New Tax Rate will redirect to Tax Rates page

Related Articles
Related Articles
How to Create Activities
This article will help you to setup Activities for the Project Project activities are the individual actions, and processes that need to be carried out to complete a specific project. Navigate to the Web Portal and login On the left-hand main menu, ...How to create Locations
Follow the steps below to create a new Depot Location Watch this interactive video to see how it's done Navigate to the Web Portal and login On the left-hand main menu, select Admin>Company Locations tab Click on the at the top right Give you ...How to Create Bills
Follow the below steps to Create Bills Navigate to the Web Portal and login On the left-hand main menu, select Purchasing and Bills> Bills Click on either "Add New Record" or the "+" sign to initiate the creation of a new Bill. Choose the Supplier ...How to Create Service Plan
Follow the steps below to create new Service Plan Navigate to the Web Portal and login On the left-hand main menu, select Assets->Asset Settings Click on Update Service Plans Click on + sign to add a new Service Plan Enter Service Plan Name Click on ...How to Create Plant Hours
Plant Hours are generated when the Timesheet and Jobsheet create the Payroll Hours. To activate this feature, ensure that in the Timesheet Settings > Timesheet and Jobsheet Operation Settings, the Timesheet Hours Plan is set to "Task Entries Create ...