Form Builder Introduction - Start Building a Form
In this article, we'll explore the various fields available in 3PM's form builder, examining their functionalities, customization options, and how they can streamline data collection for your specific needs.
Creating a new form
To get started building a form, select the Form Builder tab from the top and the select the Create New Form button on the top right.
In the dialogue box that opens, from the first drop down field, select the Section the form belongs in, i.e. Projects, Assets, Resources, HSQE
Select an Icon for your form. (This is an optional field)
Next give your form a descriptive Name and select Create when complete.
Adding fields to a form
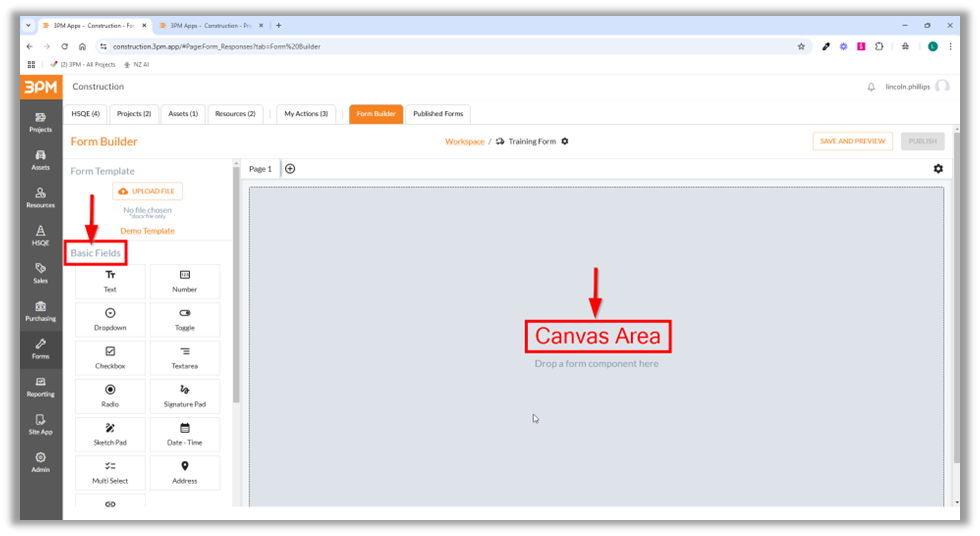
Now you are in the authoring screens of the form builder. On the left you will see the fields available for you to click and drag to the canvas in the middle.
When you click and drag a field to the canvas, a properties panel will open on the right side that gives you options to configure the field.
Properties Pane
1. Basic Section
In the properties panel in the BASIC section, you will have the option to assign a name to the field (Field Label) which will show on the form and specify a Default Value if required, such as the name of a designated contact person.
2. Grid Layout
This option allows you to organize the forms line structure by selecting one of three configurations: a three-column layout, a two-column layout, or a single-column layout with one field per line.
3. Pre Populate
4. Validation Section and Custom Error Message
Check the "Mandatory" box to make the field required for submission. A red asterisk will appear next to the field in the form to indicate it is mandatory. You can specify the minimum and maximum length of the input. Add a Custom error message to guide users in entering the correct information should they not complete the field when submitting the form (not required).
5. Field References

Related Articles
Related Articles
Form Builder Introduction - Navigation
Getting Started with the 3PM Form Builder Accessing the Form Builder: Step-by-Step Access Instructions: Step 1: Log into the 3PM platform using your credentials (username/password). Step 2: From the navigation menu on the left side, click on "Forms". ...Form Builder - Creating a form with fields and viewing the responses
In this module, you will learn how to create a form with fields, see how the mobile users will use the form and how to review the responses. Watch this video to see how it's done! Create the form 1. Navigate to Forms from the left navigation menu. 2. ...Form Fields and What They Do
In this module, you will learn how to create and manage forms using a form builder tool. You’ll be well-equipped to create forms that are both functional and user-friendly, ensuring a smooth data collection process. We will dive into the various ...Forms Multi Select field
In this module, you will learn how to use the Multi Select field option in the 3PM Form Builder. This will allow users to select multiple options from a predefined list of choices. It is useful for capturing data where more than one selection is ...Forms Conditional Configurations
In this module, you will learn how to use the Conditional Configuration options in the 3PM Form Builder allow you to create dynamic forms that respond to user input in real-time. By setting conditions, you can show or hide fields, skip sections, or ...